Wednesday, September 9, 2009

Time to Make A Jeans Skirt for Fall!

Saturday I made a pair of jeans into a skirt. The jeans weren't old or worn or even too short: I made them into a skirt because these pair of Levis I bought last fall had a goodly amount of spandex in them. And while the spandex made them very comfortable, I was NOT comfortable leaving the house wearing them. The spandex molded the jeans to my body in a way that left little to the imagination and that wasn't cool. My choices were to donate them to Goodwill (but then I'd be inflicting them on some other unsuspecting soul), or make them into a jeans skirt.

This is the third jeans skirt I've made since I started sewing and I have used the same instructions each time, which are the BEST and easiest instructions I have found on the internet. The instructions are from savyseams.com and they are found here. Go ahead a look at them. Go on - I'll wait for you to get back.

I guarantee you that if you can operate a sewing machine, you can do this. I'm posting how I did it using savyseam.com's instructions because I have a few tips to add. First, I used the two panel method, rather than the four panel. That is, I added fabric at the front and the back, but not on the sides. This mades the skirt a little more straight, and less flare-y.

OK, start with a pair of jeans and cut the legs off. I cut my legs off 19 inches from the bottom. The way to get the most accurate cut is to measure from the hem up: Next, cut off the inseam in accordance with the instructions. This is one of the reasons I really like the method from savyseams.com. You aren't fiddling with a seam ripper to undo the seam, you just cut it off: Next, draw a line from about 2 inches below the back yoke to the bottom of the leg, like so:
And cut like so:

Do this on the front as well, about 2 inches from the end of the zipper. See the instructions at savyseams.com:


Refer to the instructions to release the front and back center seams, and then iron the raw edges of the former inseam under about a half an inch:


Use the fabric from the legs you cut off to fill in the triangle areas in the front and back of the skirt, and then pin. I do one side at a time. This is the back:

First, edgestitch along your folded edge, then stitch again about a quarter of an inch from the edgestitching. It will look like this:

One thing I have discovered is that thread made specifically for jeans doesn't work so well. I just use regular thread in a color that matches close enough. Works well.
This is what the inside will look like. After you do your stitching, cut away the excess on the inside of the skirt:

Do this, of course, for the front and the back. Now you just have to hem it. The way I hem it is to lay the jeans skirt flat and measure down from the waist. I marked my hem 21 inches from the top:

When you lay your skirt flat, make sure the front waist naturally falls lower than the back waist. This will make you hem a lot more even:

After marking, cut the front and the back to length at the same time:

All trimmed up:

Next, I like to run a machine stitch around the bottom about 1/2 inch from the edge of the skirt:

Then I like to throw the skirt in the washer and dryer and let the bottom hem just naturally fray. Unfortunately, that didn't work on this skirt. I think it is because of the spandex in the fabric. After washing and drying it, my hem just looked like this on the right in this photo:

On the left you can see a previous skirt I made where it frayed quite nicely. Not so the evil spandex jeans - I just got strings hanging down where the fraying should be. So I used my newly-trusted serger and finished the bottom edge. I guess I could have just left it like that if I was going for the deconstructed look. But for me, "deconstructed" is the same as "too lazy to construct", so I turned up the hem just past the line of 1/2 inch stitching, pressed it, and then top stitched the hem. It ended up looking like this which is much neater:

Here is my finished skirt:

Still a bit snug, but much better! I can see wearing this with a sweater and some boots come fall.
I would say that this skirt took me about an hour and ten minutes to make, not counting the extra hemming I had to do. If you just did your hem like I intended and let it fray, the whole thing shouldn't take you very long at all. Anyway, I love those instructions - check it out!
Parting Shots: I got an apron! My LQS was having a sale on shop samples, and I spied this and grabbed it. I love it for two reasons: the adorable rick rack, and the fact that VickiW made it! It had to come home with me so as to not risk it going home with someone who wouldn't value it:
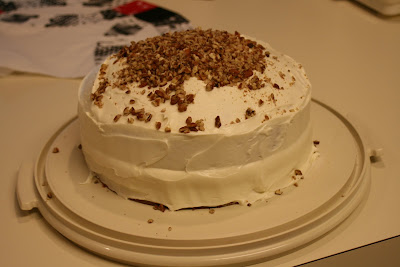
So to celebrate, I had to cook! I made my first red velvet cake in the new cake pans my mother gave me. It was yummy, and I even let other people have some!
Saturday, September 5, 2009

Quilt Binding Further Explained

I got a beautiful email from Laurie asking for further clarification on my quilt binding tutorial, which I am only happy to attempt to answer. Specifically, she wants to know how to fold your binding parallelogram before you begin your rotary cutting of the binding strips. Frankly, this step always requires me to sort of stand back and think about it myself each time. But here is the answer:

Let's pretend this is your binding parallelogram:

This is just a strip I had lying around, and we will use it for demonstration purposes. See how the sides are cut on the bias? Now turn your parallelogram like this, so that your bias edge is on the vertical lines of your cutting mat like this: Then fold your binding parallelogram like this:

And then cut your strips on the vertical lines of your cutting mat. That's it. I know the folding seems unnecessary, but that is because this strip used for demonstration is a lot smaller than your binding parallelogram if you are making a lot of bindng. Your binding parallelogram will be big, and folding it will allow you to cut your strips easily using your acrylic ruler, which is probably no more than 24 inches long.
I hope this helps - please email me or leave a comment if you have any other questions. Thanks so much for the feedback, Laurie!

Saturday, August 29, 2009

I Actually Sew Something


I haven't been sewing a lot lately because, frankly, I've been dating. I had forgotten how much time that takes out of your life! But I finally had a whole Saturday just to sew, and I got inspired to make a wool circle skirt. Yesterday, I wore the yellow dress to work:I realized I hadn't worn it all summer, and summer is waning fast. This is my tried and true bodice with a circle skirt from this dress pattern:

I got compliments on it all day long from both friends and strangers (thanks to the woman in Panera who told me how much she liked it!), so you'll have to believe me when I say it looks better on me than on the hanger. I had forgotten how much fun it is to wear a circle skirt, so I decided I needed to make just the skirt with a waistband from a beautiful piece of wool I have had aging in my stash from 2003. I got it at The Fabric Place outside of Boston which has now gone out of business. I still had the write up the saleslady gave me: 3 yards of 60 inch wide wool at $9.99 a yard. It is a dark, dark blue, with a very subtle plaid to it and has such a wonderful hand, it could slip through the proverbial ring.
I spent some time laying out the fabric so the sides would match up horizontally. I laid the excess fabric over my ironing board so the fabric wouldn't stretch as I cut it out.

The width of this fabric was just barely enough to eek out this skirt. As soon as I cut it out, I put painters tape on the wrong side of the garment pieces because it is a great way to keep the right side and the wrong side differentiated until you get it put together:

I ended up putting in a black zipper instead of a navy one because the fabric was just so dark. Here you can see the difference:

Circle skirts are generally easy because there are no darts, and very little fitting other than the waist. But for some reason this skirt took me nearly all day.

Blogger is aggravating me and won't let me move my photos around, but you can see from the photos up top that I used my serger to finish the seam allowances, even though the thread didn't remotely match, but I figured no one was going to be looking at my seam allowances. Also, you can see the horizontal plaid matching at the side seams. I used my walking foot to sew the side seams. I used a button as my closure rather than a snap, mostly because I can get my sewing machine to do the buttonhole AND sew on the button automatically, while the snap closure requires actually hand sewing. And we don't want that.
I used bias tape to hem a la Summerset, as I did for the silk dress and it worked well. I tried the walking foot to sew the machine hem, but that didn't work very well and went back to the regular foot. Circle skirts are a PITA to hem, though, just because the hem goes on forever and ever. I considered lining this skirt, but that was going to require me to hem the lining as well, I decided I would just wear a slip instead.
I was aiming for a 29 1/2 waist for this skirt, but it ended up being nearly 30 inches. Don't know how that happened since I clearly marked 29 1/2 inches on my waistband, but there you go. That extra 1/2 inch will probably come in handy this winter when I am tucking in sweaters. I have discovered that the trick to wearing circle skirts is to wear them with closely fitting tops. If you don't, you look shapeless.
One last note, I cut the waistband on the bias. I do this for all my wool skirts ever since a Korean lady in Massachusetts told me to do this because it would make my waistbands lay closer to the body. I don't know if it is true, but I like the bias effect on my plaid skirts and I don't have to worry about matching the plaid with the skirt.
Bring on Fall!

Thursday, August 20, 2009

The Crab Dress Goes to London!

I spent last week in London; business for me, but a vacation for my mother, who hadn't visited in fifty years! Of course, the Crab Dress had to go too, and on our first full day there, we headed over to the Victoria & Albert Museum which is my absolutely favorite museum in London: The V&A is dedicated to art and design, which includes fashion. Mother and I enjoyed the wardrobe displays of women's dresses and suits from the 1600s to the present day, as well as the history of the man's suit. I always hit the V&A on every visit to London, and if you go I heartily recommend it. I have never been able to see the entire museum as I always begin with the fashion collection. My next favorite collection is the British furnishings displays from the 1500s to the 1700s. Just let me live there and sleep in the Bed of Ware!
The museum also has an excellent cafe and a paddling pool which the British used because they thought 76 degrees was hot:

We were exceedingly blessed with excellent weather, the better to show off Big Ben:
We went to the British Museum as well, near our hotel:

Is this not the most stunning museum you have ever seen? I was able to see the Rosetta Stone, one of my goals in life, along with an excellent Egyptian collection which included several mummies. As my mother said, "The British really know how to do a museum." And it is all free.
We stayed near the Covent Garden area and went to a restaurant one night that is decorated to look like the theatre itself:
Apparently, the restaurant has live opera singing every Sunday and Monday nights, but fortunately we missed that and just had a quiet meal instead.
No fabric shopping for me all week; I was tempted to go to Liberty's to shop for Liberty fabrics, but I've been there before and I have decided I am just too bourgeois to pay that much money for cotton fabric. (Now silk - silk is a different story!) It was a great trip, and I won't bore you with too many photos, but London is a city you could go to year after year and never see it all. Still, it is good to be home!
Parting Shot: One of the most moving experiences of the trip: a group of the blind were visiting the Battle of Britain Memorial and were feeling the relief sculpture:

Friday, August 7, 2009

London Calling!

I'm off to London for a week on business - Mother is coming with me; she hasn't been in London since she was twenty years old. I think she will have a better time that me!

I'll post when I get back - I think the Crab Dress is going . . .

Saturday, August 1, 2009

A Sewing Angel Gets Her Wings!

This week I was lucky enough to give my friend, Aimee, her first sewing lesson. (That's her on the right.) I usually start off with a pillowcase for a first time sewer, but Aimee could already sew a seam and had operated a sewing machine, plus she had bought enough fabric at our LQS for five skirts, and a skirt is what she wanted to make. So we made this one, McCalls 3341, which is a good choice for a first skirt, and I've made many times. Simple, 4 darts, no waistband:
We made view D, the above the knee version. This skirt usually takes me 3 hours to make. We made it in 4 hours on Wednesday night, which is pretty good for a first time sewer. She did a great job:
The fabric she chose is an upholstery weight twill, which was a dream to work with. I didn't note the designer, but we both loved it. Here is the back and you can see what a great job she did on the darts, the waist and the zipper:

Strangely enough, I am the one wearing the skirt in these photos. Aimee wanted me to model the skirt while she took the photos once we finished! The best part about teaching her to sew is that she and I are the exact same size, so alterations are not even an issue. I showed her how to put in the zipper according to my zipper tutorial and she was surprised how easy it was.
Aimee wore the skirt to work on Friday with a brown sweater and looked great. My plan was to take her photo in the skirt, but of course, I forgot to bring my camera to work. She enthusiastically wants to make her next skirt Monday night.
Aimee and I played with my new serger on this skirt and used it to finish the seam allowances. It was a LOT of fun and Aimee was really fascinated with the serger.
This morning, however, I started the day slowly. I finally decided an easy project was the way to go. My friend, Kevin, turns 30 years old on Monday, so I made him some boxer shorts as a gift:
I used some quilting fabric manufactured by Alexander Henry that was left over from a shirt I made my friend Glen a few years ago. I was able to play with my new serger with this project:

As usual, I put in a button on the fly, rather than a snap because I think it looks nicer:

I used this pattern, Simplicity 9958 which I have shown you before:

I think Kevin is spending the weekend celebrating, so he'll get these when/if he returns to work next week!
Last week I spent the weekend at the beach at the bay in Mathews County:

It was really beautiful and really relaxing. The backyard of the house I stayed:

The shell of a horseshoe crab:

The New Point Comfort Lighthouse in the distance:

More sand:

Parting Shot: The Crab Dress goes to the beach! Like I would leave it at home . . .