I made this version without the belt loops since I didn't want to have to wear a belt with them:

I still can't believe how great these fit:


The only alteration I made was to lengthen legs by 1 inch. I'm 5'5" so I'm not terribly tall or short, but these pants legs do seem a big short. Since the legs are straight, I just lengthened them by chalking off an extra inch right on the fabric as I was cutting out:

I also took the time to make separate pattern pieces for the waist facing. The instructions tell you to use the same pattern pieces for the facing as you do the waist, but cut off 3/8 inch from the bottom edge for the facing. I forgot to do this on my first version, so I just traced off new pattern pieces for the facings, eliminating that 3/8 of an inch so I won't forget again:

My insides are much improved from my first version:


Doesn't that quarter inch bias seam binding look so neat on the bottom edge of the waist facing? Also, as you can see, I used a snap instead of a buttonhole and button in the fly extension. I just went quick and easy on this one.
These trousers are also the first garment I made on my new Juki. For the first pair of trousers, I didn't want to deal with a new machine and a new pattern at the same time. For my in-the-flow skirt, I wasn't feeling well and still didn't want to figure out my new machine. Finally, I realized that bonding with a new sewing machine is like learning a new language - the only way to get fluent is total immersion. So I packed away the beloved Bernina, and spent a good portion of time making these pants. Everything was hard - what foot do I use for the overlock stitch? WHERE is the overlock stitch? How do I change the needle position? Everything had to be looked up in the manual. It was a bit frustrating, but it will get easier with time. Once that happens, I'll post a review.
In the meantime, I want to post a fly zipper tutorial for these pants. This is a great pattern, and I wouldn't want someone to pass it by just because they have never done a fly zipper or they aren't that experienced with them.
The instructions with this pattern have you do the fly zipper first thing, which appears somewhat unique - most trouser/jeans patterns have you dealing with the back pattern pieces first with darts, pockets, etc. What is good about these instructions is that you get the fly zip done right away so there isn't any fretting about it.
For the fly zip you need three of the pattern pieces, numbers 3, 7, and 8:
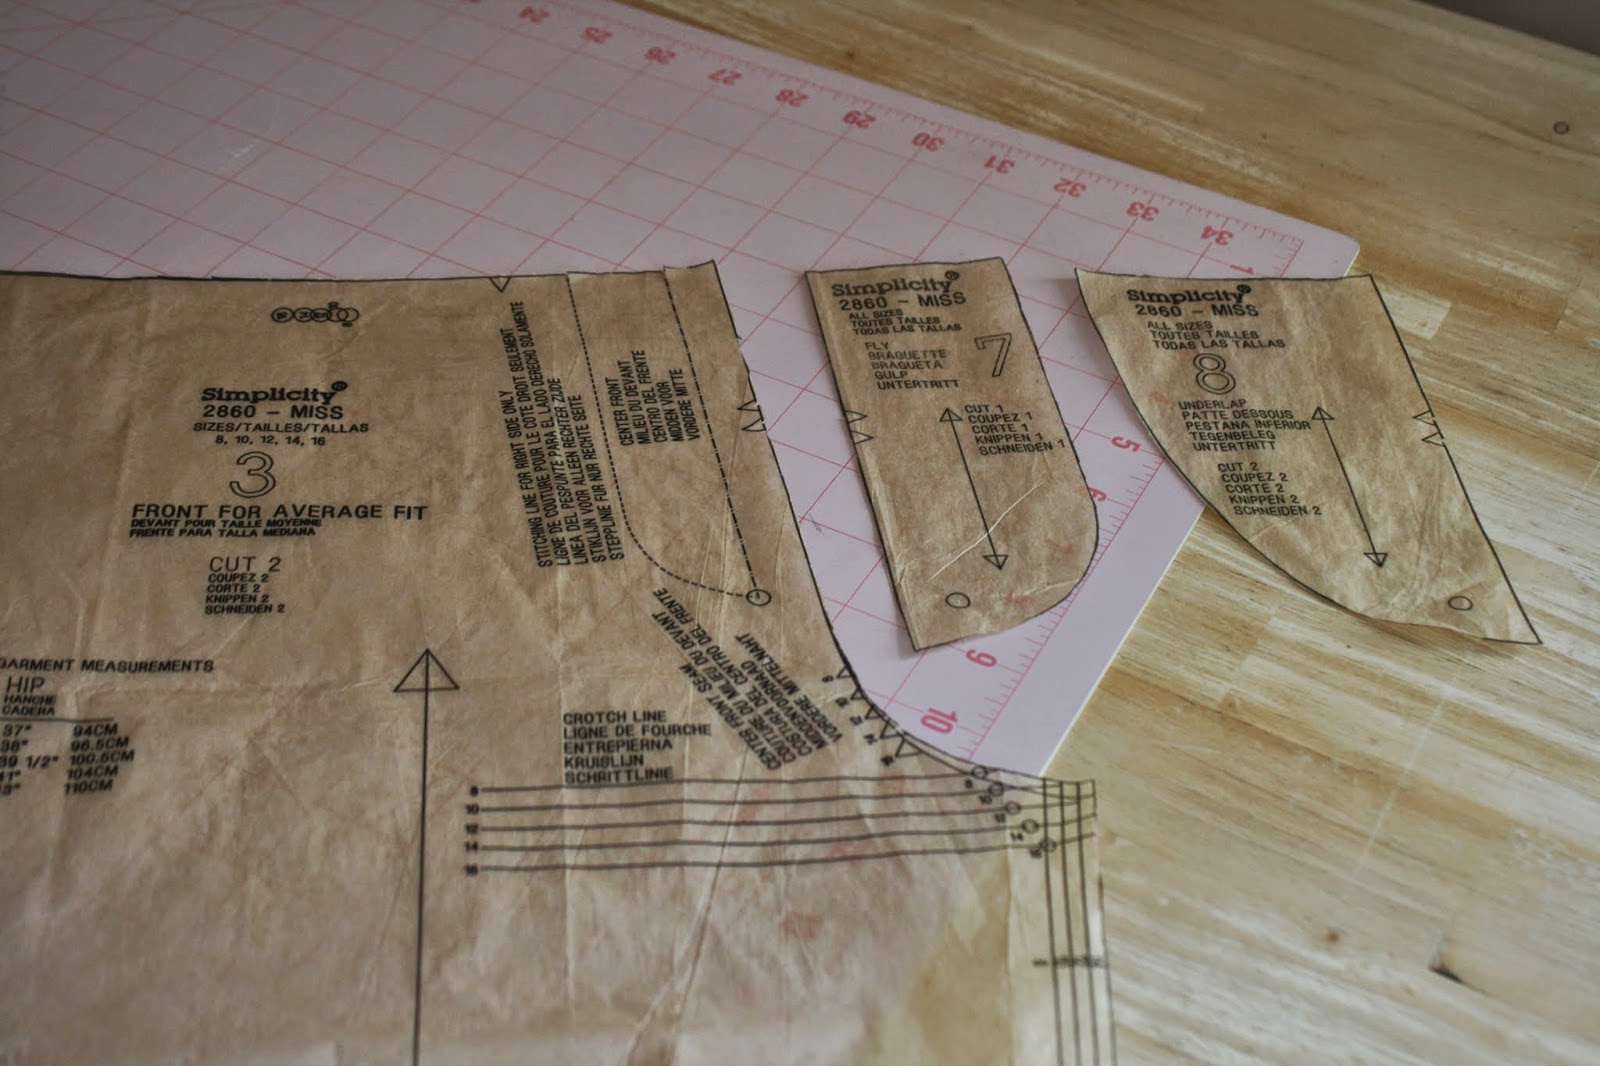
Number 3 is the trouser front pattern piece, number 7 is the fly, and number 8 is the fly extension (the instructions call it the "underlap"; I call it the fly extension). There are three markings that are really important in putting in this fly zip, so be sure when you are cutting out that you mark them. The first is the big dot on all three pattern pieces:

The big dot is important so that everything lines up correctly and your topstitching doesn't hit the end of the zipper and break your needle. The second are the two notches on all three pattern pieces:

And the third is the center of the front of the pants, which I am pointing out on the front pattern piece:

This marking is important because you want this marking on the right and left sides of the front of your pants to match up when you zip up your zipper. That way you will know it is a) correctly installed; and b) your waist is the correct size.
OK, cut out your pattern pieces. Step one of the instructions tells you, "To reinforce front, stitch along seam line for about 1" each side of large dot, stitching through large dot." Here's my large dot on the front pattern pieces marked:

And here I have reinforced 1 inch on either side of the large dot:

Do this for both the left and right fronts.
Step two tells you to sew the two fronts together from the notch to the big circle. This is what they are talking about:

Here are my two fronts sewn together from the notch to the big circle:

Step two then tells you to clip the right front pants piece to the reinforced large dot:

(To make sure you are clipping the right front pants piece, hold the pants up to you like you are wearing them, and identify which side you will be wearing on your right.)
The next thing you want to do is take the fly piece (number 7) and sew it onto the right side front piece. But what the instructions don't tell you is that it would be helpful to finish the curved edge of the fly before you do this. You can use a serger, or use the overlock stitch or zig-zag stitch on your sewing machine. I think finishing the fly this way will make the inside of your pants a lot neater. Here you can see my fly piece. I just used my Juki's overlock stitch (once I figured out which foot to use and which numbered stitch it was!):

OK, now that your fly is finished so prettily on the curved edge, we can return to the instructions. Step three says, "With RIGHT sides together, pin fly to RIGHT front edge, matching large dots. Stitch above large dot. Trim seam above clip to 1/4"."
Here I have sewn the seam.

And here I have trimmed the seam to 1/4 inch:

Step four has you press this seam towards the fly:

Next you want to flip over to the right side and give another good press:

OK, now we are ready to begin zipper insertion. Step four continues, "Place closed zipper, face down, over fly, with lower end of zipper about 1/4" above large dot and zipper tape extended 1/4" over fly seam, as shown. Stitch zipper on RIGHT edge of tape, as shown, using an adjustable zipper foot. Turn up lower edge of LEFT zipper tape to keep it out of the way as shown."
It's my opinion that Simplicity's diagrams on this step are lacking. So this is what you want to do. The first photo below shows the zipper placed down upon the fly, and the end of the zipper 1/4 inch above where the large dot is marked:

And this second photo shows the zipper teeth about 1/4 inch from the fly seam:

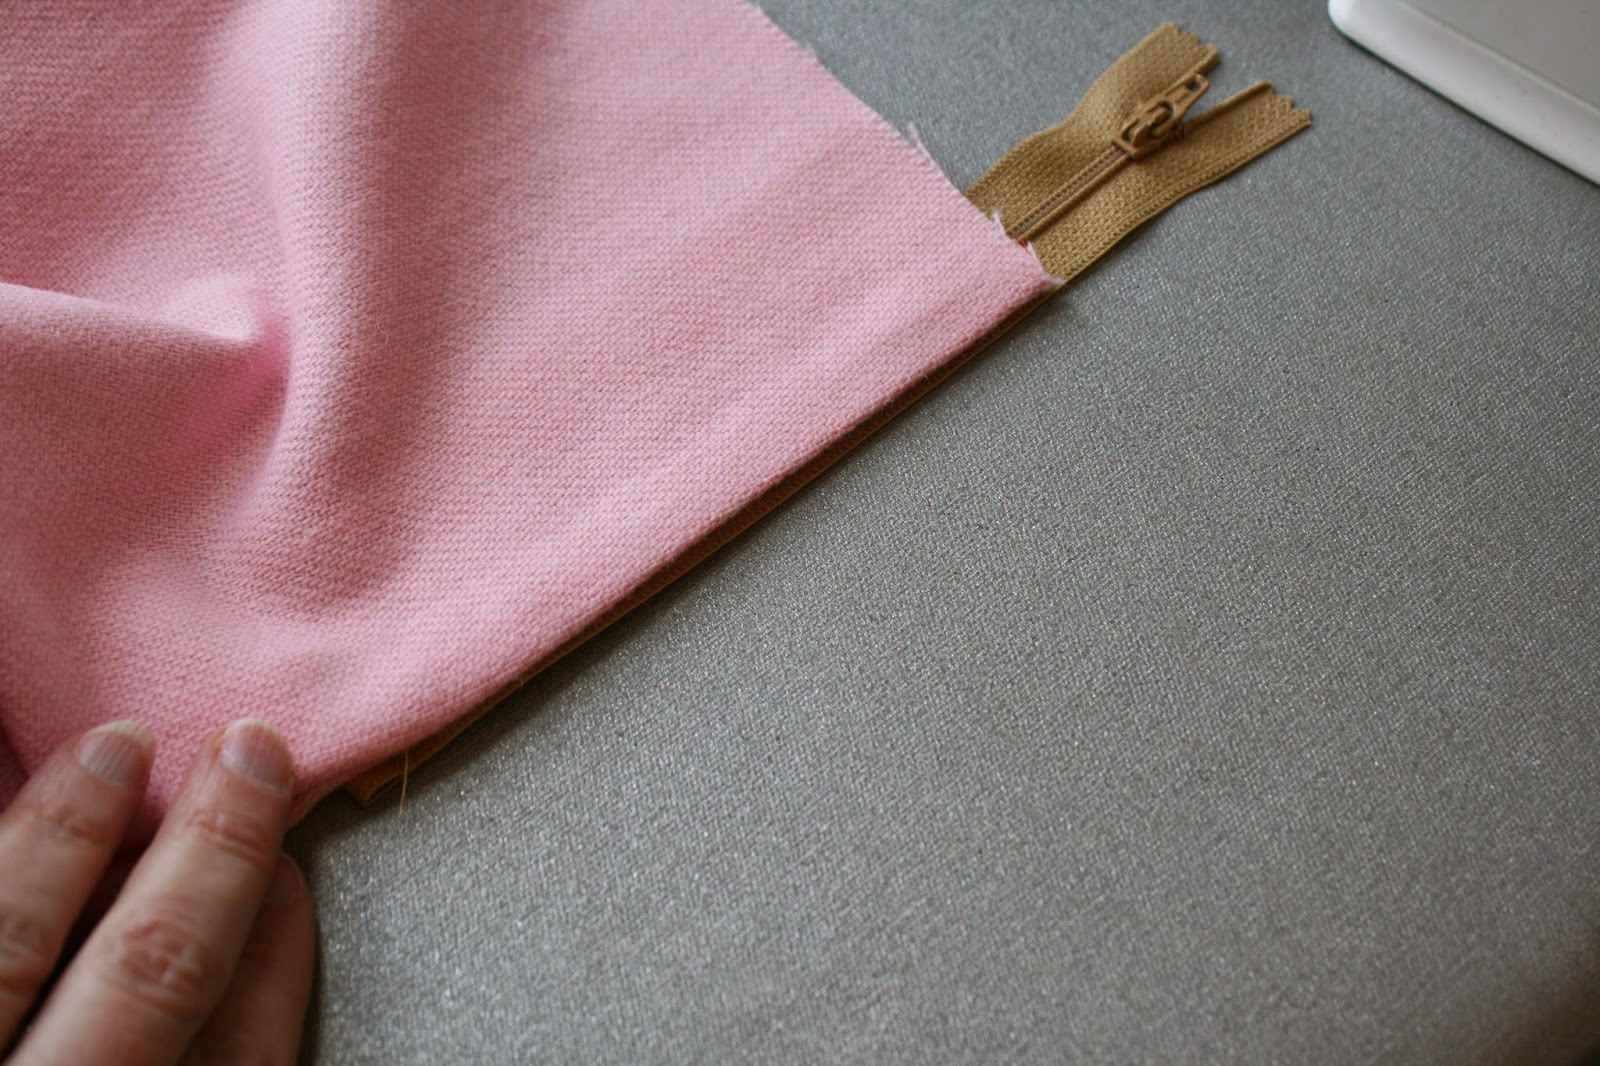
Once I had the zipper placed as above, I pinned the left zipper tape to hold the zipper in place, and then sewed the right zipper tape:

Then, as per the instructions, I turned up the lower end of the left zipper tape to keep it out of the way:

Step 5 has you turn the fly to inside along the seamline and press which I did:
Step six actually has you sewing your zipper topstitching which is a surprise because for the zipper flys I have done, this is usually the last step. But I am happy to do the topstitching in step six and get it over with because I usually stress about it since is the only visible part of the zipper insertion anyone will see.
But the instructions in step six have you basting the stitch line and all that, which I don't do. This is how I mark where to topstitch: I take pattern piece 3 and I trace onto a scrap piece of tissue paper the shape of my topstitching:

Then I place it on top of my right front piece:

And stitch around the edge:

Then remove the tissue template:

And ta-da!! Topstitching done with no marking or basting. Basically, front fly topstitching without tears. (I'm using red thread, of course, so y'all can see what I am doing.)
OK, the right side is done. Let's work on the left side.
Step seven says, "Make a 3/8" clip at large dot in LEFT front. Press under 3/8" above clip." Here I have clipped and pressed:

Step eight says, "Open zipper. Pin left front over zipper tape close to teeth. Baste." So here you can see I nestled the left front folded edge close to the zipper tape:

And I actually hand baste the zipper to the left front edge, which is one of the few times I ever hand baste ANYTHING:

The reason I'm handbasting is you have two layers of fabric on the left front edge that need to be attached to the zipper so it doesn't move when you sew it in. Once you have it basted, close the zipper tape to make sure the zipper is covered by the right edge of your pants and that the front center marks line up with each other:


But don't permanently sew the zipper in yet. We need to baste the fly extension in first. Take pattern piece number 8 and follow Step nine instructions, "With RIGHT sides together pin fly extension sections together, matching large dots. Stitch curved unnotched edges together. Trim seam; clip curves." That's easy:

Here I have sewn the curved edge and trimmed the seam. Then I turn it to the right side and press. Step 10 has you baste the raw straight edges together which I did:

What Step 10 doesn't tell you is to finish that straight raw edge. Again, your trouser innards are going to look better if you finish that edge:

The rest of Step 10 instructions is a little confusing in my opinion. Here's what you do: line up the edge of the fly extension with the folded left front edge (remember, you folded it to the wrong side 3/8 of an inch). Here's a photo of me beginning to line it up:

The straight edge of your fly extension is going to line up with the raw edge of the left front pants, with the zipper tape sandwiched between them. Then you baste the fly extension in place. I use Steam-A-Seam for this step:


Then flip everything over to the right side, and sew the zipper close to the zipper teeth, using a zipper foot to get close:

And guess what??? You are done!! Give the front of your pants a good press and admire them:


Of course take out any stray basting threads or stay stitching threads (which I didn't completely do above). The last of the instructions, Step 11, has you hand-tack fly and the fly extension "as shown". As far as I am concerned, this is an optional step. I didn't do it for my first pair of pants from this pattern but I did do it for the linen/silk pants above. You want to tack right where my thumb is on the photo below:

But I didn't hand-tack it; I just machine stitched it a few times and called it done. I also trimmed the end of the zipper so it wouldn't show so much.
I hope this helps. One of the reasons I love reading blogs is not only for inspiration, but so as to become a better sewer. Hopefully, this tute can help someone a little farther down the line in fly zip expertise. Let me know if you have questions, I love to help!


