First, sew your seam, switching to a basting stitch in the area where the zipper will open. In this photo, I put a pin with a red head where the zipper ends so I know where to switch from the basting stitch to a regular length stitch:

After you stitch your seam, finish your seam allowances and press the seam open:

Next, I use Light Steam a Seam to secure the seam allowances:

This Light Steam a Seam is one quarter inch wide. Just cut a strip the length of your zipper and slip it in between the seam allowance and your skirt fabric like so:


Take the paper layer off and iron the Steam A Seam so that your seam allowances firmly adhere to your skirt. This will keep them from moving around as you sew your zipper:

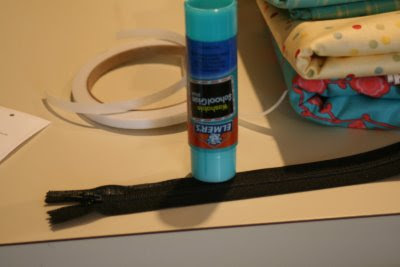
Next, you want to place your zipper right side down on the seam. To adhere the zipper to my skirt, I use a glue stick. Yep, rather than fancy basting techniques, I just use a regular old glue stick. I used to use a fabric glue stick, but I discovered any glue stick will work:

Apply the glue to the right side of your zipper and then position the zipper, right side down, over your seam like so:

Now, and this is the crucial part, go get yourself a Diet Coke and cookie. (You know you want to.)

Would I steer you wrong on this? I would not.
While you are eating your refreshments, the glue will dry on your zipper, thus making it secure for sewing purposes. But before you actually sew it in, you are going to need 1/2 inch Scotch tape:

You are going to use the Scotch tape as your sewing guide for the great zipper sew-in. Flip your skirt over to the right side, and apply the Scotch tape over the seam allowance for the length of your zipper, like so:

Using the Scotch tape as your sewing guide will give you a nice quarter inch guide on either side of your seam as you sew in the zipper. Start at the top left like so:

Continue until you reach the bottom of your Scotch tape, and thus, your zipper, pivot, and sew across the seam:

Then, pivot again, and sew up the other side of the Scotch tape, completing the sewing of the zipper:

Remove the tape and your basting stitches, and you are done!


I know this seems like a lot of steps, but once you learn it, it goes quickly, and you know your zipper will not move during the all so crucial sew-in.
Parting Shot: VickiW and I met at Joyce's today for her fat quarter frenzy sale (which is still going on tomorrow if you are interested!) and a lot of stuff was purchased. I actually bought more than she did, and that is unusual. So much so, we had to have lunch afterwards, just to re-energize ourselves! Here's a photo of my haul:

5 comments:
....and then I had a nap because the Tech UVA game was so pitiful.
Thank you so much for this tutorial! I tend to avoid all zippers and buttonholes but after this I think I could try one again!
Besides who couldn't love a tutorial that includes cookies!
Siobhan
BRILLIANCE! Especially the cookie part ;D
Thank you!
Wow! It really works! I used blue painter's tape because it's easier for me to see and follow. The zipper looks professional. Thanks so much!
To both Anonymouses - glad the tutorial worked for you!!!
Post a Comment