Sunday, December 7, 2008

Weekend Wrap-Up

In addition to working on Christmas gifts this weekend, I was able to work on Tammy's Asian Strip Gift Quilt. The fabrics are luscious and it is turning out better than I imagined. I still need to add the sashing and the border, but above is a quick shot of it. Between the snow on the ground and the twenty-five miles an hour winds, I was unable to get a proper photo. But here is a close up:

I am hoping I can get this done this week, along with my Christmas gifts - I'm getting a little carried away, but fortunately, I feel good and I have the energy, so as long as I feel good, I'll keep sewing.

I was relieved to find out that Summerset cuts out all her creations with scissors, not a rotary cutter, so I've decided to give myself a break and forgo the practice with the rotary cutter on anything that isn't a straight line. If it is good enough for Summerset, it is good enough for me.

And Judy has got me interested in learning how to bake bread. I'll bookmark that one for after the first of the year.

Parting Shot: A vintage pattern that I am planning on trying out come spring. I think I got it in Carytown this summer when Summerset discovered that a second hand shop that I had been going to for years sold vintage patterns. Who knew?

Saturday, December 6, 2008

It's Snowing!

I took a half day off yesterday and I am glad I did because I was able to get a photo of this:

This is the lap size quilt I having been making for Prayer Sister Maria. Yesterday afternoon was the last sun I saw and I was able to get this close up as well:

This quilt was made from a pattern I got at the Mid-Atlantic Quilt Show in February. I can't remember the company who devised it, but it is one of those quilt patterns you can make from five fabrics each 1 yard long. I obviously used more fabrics than that, mostly from the Moda line. Maria loves flowers and she loves pastels, so I thought this quilt was perfect for her.

I made my Prayer Sister Donna a quilt from this same pattern, in the five fabrics as intended. I also got a photo of it yesterday while the sun shone:

Here is a close up:

I'm pleased with these, although as I have said before, the pattern was so easy that I found it boring and as it result, it took me 10 months to get them done. Not good.

These quilts will go to the machine quilter after the first of the year; the size is just on the cusp of too large for me to machine quilt, and besides, I hate machine quilting on my sewing machine.

Parting Shot: I have no parting shot tonight, but I should have taken a photo of the dinner I made. I cooked! I made a pork roast, according to the instructions given to me by Greg, Sherri's husband. I made it with apple cider as my basting liquid, and I cooked onions, crab apples, and carrots with it. Also made sweet potatoes in butter and brown sugar. And then I shared it with Glen and Tammy since I very well couldn't eat all that by myself. The roast wasn't as good as Greg's but then, he is a professional chef - I'll have to pester him some more on further details of the great pork roast receipe. But everything tasted pretty good.

Thursday, December 4, 2008

Happy Birthday, Anne!

It's Anne's birthday today and last weekend I made her four of these placemats:

The pattern came from "The New Handmade" by Cassie Barden.

I'm enormously pleased with these placemats, as there is a pocket for the napkin and silverware. I quilted them according to the directions with just diagonal straightline quilting.


The blue fabric has fishies on it and the white fabric has flip flops, which makes them perfect for her river house.

I may try more projects from Ms. Barden's book - the instructions are clear and her projects are easy, yet clever. It is full of things I would actually make.

I hope to get going on Tammy's Asian quilt this weekend. Until then, check out Audrey's new purple jacket - it looks like a shirt and jacket, but it is actually one garment. Also, Isabelle is back and I am great relieved. I have to say that Isabelle has the best cat in all of blog land. I read her blog not just for her creations, but also to see her gorgeous cat.

Parting shot: I made Christmas cookies!


Actual, from-scratch-roll-out-cookies. Gingerbread, to be exact. Which I have never done before. I got the receipe from my friend Sherri, who passed some around at Thanksgiving dinner. I loved them so much, I asked her for the receipe. I'm pretty pleased at how these turned out, although they don't seem to taste as good as Sherri's, but maybe I need more practice. Half of these are going to my sewing guild meeting on Saturday morning where we are exchanging cookies, and half of them will be given to friends!

Sunday, November 30, 2008

First Day of Advent

I hope everyone had a wonderfully blessed Thanksgiving. Mine was fabulous, with good friends and much sewing. I believe this long weekend was a meaningful way to begin Advent, a season of preparation before Christmas.


Let's look at the list I wrote on Wednesday night:

1. Finish the lap quilt for my Prayer Sister, Maria - done! I'll post a photo later in the week; the weather today simply did not cooperate with picture-taking.
2. Finish a project I am secretly doing as a gift - done! But I can't post a photo until after the giving of the gift.
3. Begin sewing the blocks for Tammy's Asian Strip Gift Quilt - begun! I actually sewed 20 of the 30 blocks. This quilt goes together fast.
4. Make a wool skirt. I'm in dire need of winter clothes - done! And I am very pleased.


The wool skirt is my tried-and-true skirt pattern, McCalls # 3341:


I've made this skirt from cotton, rayon, and wool. I've made the above-the-knee version and below-the-knee. It has no waistband, and is simply faced. If I don't line it, it takes me three hours to make it, from the cutting out stage to the hem. As I was making the above-the-knee version from wool I got from Gorgeous Fabrics, I lined it in a luxurious silk charmuese I got from Fashion Fabrics Club.


I line all my wool skirts in silk - it feels luscious, and if you get the silk on sale, it really doesn't cost much more than quality lining. And I believe that is the real advantage of sewing your own clothes; you can make it in a way that you really can't find in ready-to-wear. How much would you have to pay for a skirt lined in real silk? Too much.


The wool is a black and tan check:


I know it doesn't look like much on the hanger, but I love the way it fits and the silk makes it a joy to wear - it is warm, but the fabric breathes. Here are shots of the lining inside:


The lining is free-hanging; I've done it both ways, but today I was in the mood for a free hanging hem. One thing I did differently on this skirt was to cut out the skirt and lining using a rotary cutter rather than scissors. I can't say the rotary cutter was superior in any respect, but I suspect that my lack of experience makes me unqualified to really say. I was mostly paranoid that I would accidentally cut into the pattern. So then I ended up with portions where I didn't cut closely enough. My verdict is that I need more experience with the rotary cutter.


I finished the skirt seam allowances with my Bernina overlock stitch (stitch number 3), but I finished the lining seam allowances with pinking shears, which I normally avoid like the plague because nothing screams home made more than pinked seam allowances, but given that this was a lining and which no one will see, I went ahead.


I hope everyone had a productive Thanksgiving and I look forward to seeing your projects.


Parting shot: My Prayer Group! Maria, Jamie, me, Donna, and Judy. We took this today after Mass in honor of Advent. Not pictured is the Other Donna, as we call her.


Saturday, November 29, 2008

Kim's No Fail Centered Zipper Tutorial

I hope everyone is having a wonderful holiday. I am thrilled with how much I am getting done and I am on track to finish the projects I had planned which I will show you at the end of the weekend, including the wool skirt I wanted to make. I took photos today as I was putting the in zipper. My repetoire is not extensive when it comes to zippers, but I have a method that consistently works, so I stick with it. I guarantee you that this method will ensure that your zipper will not move as you sew it in.

First, sew your seam, switching to a basting stitch in the area where the zipper will open. In this photo, I put a pin with a red head where the zipper ends so I know where to switch from the basting stitch to a regular length stitch:

After you stitch your seam, finish your seam allowances and press the seam open:
Next, I use Light Steam a Seam to secure the seam allowances:

This Light Steam a Seam is one quarter inch wide. Just cut a strip the length of your zipper and slip it in between the seam allowance and your skirt fabric like so:


Take the paper layer off and iron the Steam A Seam so that your seam allowances firmly adhere to your skirt. This will keep them from moving around as you sew your zipper:

Next, you want to place your zipper right side down on the seam. To adhere the zipper to my skirt, I use a glue stick. Yep, rather than fancy basting techniques, I just use a regular old glue stick. I used to use a fabric glue stick, but I discovered any glue stick will work:

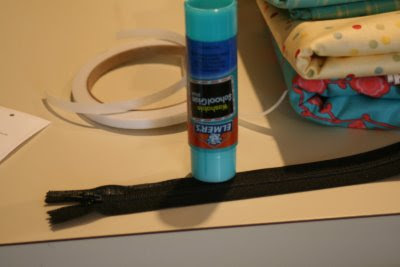
Apply the glue to the right side of your zipper and then position the zipper, right side down, over your seam like so:

Now, and this is the crucial part, go get yourself a Diet Coke and cookie. (You know you want to.)

Would I steer you wrong on this? I would not.
While you are eating your refreshments, the glue will dry on your zipper, thus making it secure for sewing purposes. But before you actually sew it in, you are going to need 1/2 inch Scotch tape:

You are going to use the Scotch tape as your sewing guide for the great zipper sew-in. Flip your skirt over to the right side, and apply the Scotch tape over the seam allowance for the length of your zipper, like so:

Using the Scotch tape as your sewing guide will give you a nice quarter inch guide on either side of your seam as you sew in the zipper. Start at the top left like so:

Continue until you reach the bottom of your Scotch tape, and thus, your zipper, pivot, and sew across the seam:

Then, pivot again, and sew up the other side of the Scotch tape, completing the sewing of the zipper:

Remove the tape and your basting stitches, and you are done!


I know this seems like a lot of steps, but once you learn it, it goes quickly, and you know your zipper will not move during the all so crucial sew-in.
Parting Shot: VickiW and I met at Joyce's today for her fat quarter frenzy sale (which is still going on tomorrow if you are interested!) and a lot of stuff was purchased. I actually bought more than she did, and that is unusual. So much so, we had to have lunch afterwards, just to re-energize ourselves! Here's a photo of my haul:

Wednesday, November 26, 2008

Work In Progress Wednesday

Happy Thanksgiving Eve! Four days off to eat and sew - what a delicious way to spend the rest of the week. I will not be going home to Cotton Creek, Alabama; I will instead stay here in Virginia. But I will be spending Thanksgiving day with friends who love me, so that is just as good.

I have a plan for the extended weekend - to work on projects already in progress, plus one new one. The Thanksgiving list includes:

  • Finish the lap quilt for my prayer sister, Maria

  • Finish a project I am secretly doing as a gift

  • Begin sewing the blocks for Tammy's Asian Strip Gift Quilt

  • Make a wool skirt. I'm in dire need of winter clothes.

May everyone have a safe and love filled Thanksgiving! And happy sewing to all.


Parting shot: My brother and me not far from Cotton Creek. The house is the old farmhouse my great-grandmother Daisy lived and died in and where she made all her quilts. I have great memories of this house from my childhood.

Saturday, November 22, 2008

Strip Gift Quilt

The Strip Gift Quilt is done! And I am very happy with the result. Here you can see the quilting Susan Caldwell did at Quilting Around the Block:


Here is a close up:


As I have reported before, the concept of the Gift Quilt came from VickiW and Anne, who created a pattern that could be made from 20 fat quarters easily and with very little waste. I devised this version, consisting of strips for the blocks to make it even easier.

These photos show the double sized quilt (68 in x 82.5 in) and it can be made with 20 fat quarters and 1/2 yard (or so) of sashing fabric. The queen sized version (82.5 in x 97 in) can be made with 30 fat quarters. This is so easy and fun; it is a particularly good pattern to show off a collection of fabrics by a particular designer (the above quilt was made using Piece O'Cake fabrics).
Instructions: Cut from each fat quarter strips that are 15 inches in length of the following widths: 5 inches, 4 inches, 3 inches, 3 inches, 2 inches, and 4 inches. Set one of the 4 inch strip aside. (This four inch fabric will be used in your border.) Your remaining strips will look like this:


Cut all 20 of your fat quarters like this except one. That one will be cut the same, except that you need to cut your 4 inch border strip to be 16 inches long instead of 15 inches long. You will then cut the 4 inch border strip into 4 four inch squares which will be used as your corner blocks like this:


As you cut your strips, stack them in the same order by size. Then arrange the stacks in the order that you will sew them. I like to sew my strips in the blocks from left to right as such: 3 inch strip, 2 inch, 5 inch, 3 inch, 4 inch. So my stacks look like this:


Add Image


Now you want to shuffle the fabrics in each stack so that each block you sew will be different. Leave the first stack (which is on the far left) alone. For the second stack, take the top 4 fabrics and move them to the bottom of the stack. Like this:

For the third stack, move the top 7 fabrics to the bottom. For the fourth stack, move the top 11 fabrics to the bottom. For the fifth stack, move the top 14 fabrics to the bottom. So my stacks look like this:


Now sew your blocks together. Just take the top fabric from each stack and sew the strips together. Each block will be different. And each block should be a 15 inch square. If not, trim it to 15 inches or trim all of them to a slightly smaller size - whatever you prefer. Make sure your four inch border strips are the same length as your blocks.

With 20 fat quarters, you will end up with 20 blocks. Sew the blocks in 5 rows of 4 blocks each, alternating the stripes vertically and horizontally, like this:

Now cut 2 inch strips from your sashing fabric and add the sashing to the two sides of your quilt. Then join 5 of your 4 inch border fabrics together and sew them to the sashing on each side of your quilt, like so:

Now sew your sashing fabric to the top and bottom of your quilt. Next sew four of your 4 inch border fabrics together. Add a four inch piece of sashing to a corner square and sew the corner square to each end of the border. Do this for both the top and bottom. Like this:


And you are done! Quick, with very little fabric waste! (You will end up with one 4 inch border strip leftover.) I enjoyed this so much that I am going to make the queen sized version for my friend Tammy from Asian themed fabrics we bought at The Quilt Man today. For the queen sized version, you make it the same way, except you will need 30 fat quarters and you shuffle your fabrics thusly: in the second stack move the top 5 fabrics to the bottom, in the third stack move the top 11 fabrics to the bottom, in the fourth stack move the top 16 fabrics to the bottom, in the fifth stack move the top 22 fabrics to the bottom.


Tammy was amazed at the fabric selection and had a great time picking the 30 fat quarters for her quilt! It is always fun to introduce a non-sewer to the joys of fabric. She was inspired enough to go with me to my other favorite LQS, Quilting Adventures, and buy fabric to make pillowcases herself to coordinate with her new quilt. Tammy is going to learn to sew! The quilting angels are singing!


Parting shot: our haul from our fabric shopping today. Much fun was had by all!