Sunday, January 12, 2014

Tippi Hedren Suit - Outer Jacket Complete! Butterick 2178

I finished the outer jacket today and here it is:


The pockets are going to be a lot shallower than depicted in the photo because I haven't hemmed the jacket yet (the hem is a deep 1 3/4 inches).  To make the pockets, I started by looking at the front jacket pattern piece which shows the placement of the pocket flaps:


I measured, and the distances between the two dots above was 5 inches, so I added a half inch for two quarter inch seam allowances.  I then measured to the bottom edge of the pattern piece and that was 5 3/8 inches.  Then I added another two inches because I wanted a fold-over so that the lining of the pocket wouldn't show from the top of the pocket.  So my "pattern piece" for the pocket was 5 1/2 inches by 7 3/8 inches.  I didn't worry about being exact, since I could just trim the bottom of the pocket to be even with the bottom of the jacket.

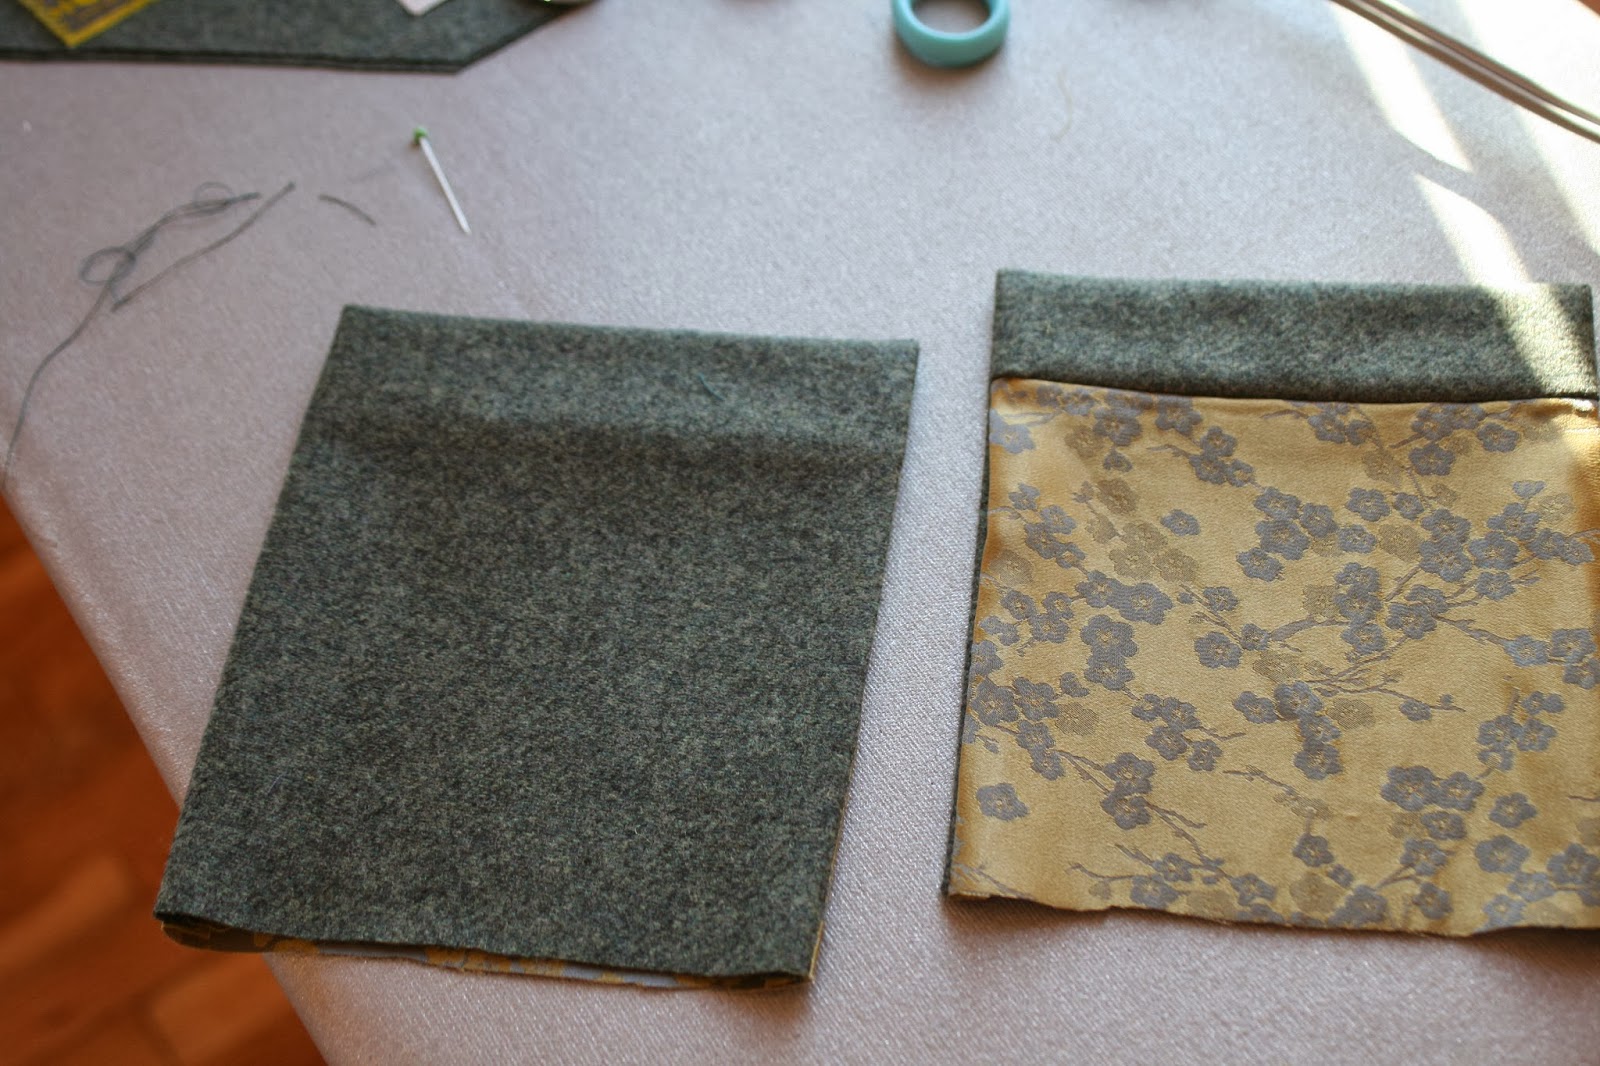
I cut two pieces from the wool and two pieces from some silk scraps from some silk my in-laws brought me from Singapore.  I sewed them together at the top using a 1/4 inch seam allowance.  Then I stitched them together at the sides, right sides together, with the wool folded about an 1 1/4 inch down.  Then I turned the pockets right side out.  Here is a photo of the back/inside of the pockets:


And here's a close up of the front pocket before it was sewn on:

To attach the pocket, I used the placement dots on the pattern piece to orient me where I wanted the pockets.  I ended up putting them a half inch closer to the front and a half inch higher than the original pocket flap marks.

Then there was nothing left to do but topstitch down the side of each pocket.  I sweated this step though, because topstitching is forever.  (Not really, but it feels like it!)  I've been using the dark pine green thread I used on my Gertie coat for this project, but I felt that it was too dark for this heathered green wool.  I ended up using dark grey thread instead, which I believe blended better with the wool.

Also, I didn't topstitch the pockets all the way to the bottom edge of the jacket because I don't want the pocket edge to interfere with my hemming. So I left the bottom inch unstitched so I can trim the pockets before I hem.  The bottom of the pockets will be covered by the lining.

Of course, as I type, I realize that I should have pressed the wool/silk top seam towards the silk instead of towards the wool; it would lay flatter.  Thus, I'm not completely happy with the pockets, but I'm not certain I'm so unhappy that I would re-do them.  I'll ruminate on it for awhile.

Today I also made a pattern piece for the cuffs, and created a pattern piece for the jacket front lining.  Still don't know if it will work, but I'll make it work.  I laid out all the still uncut pattern pieces, along with the dress pattern pieces just to make sure I'll have enough fabric.  I'll have enough with about 1/4 yard to spare!

Saturday, January 11, 2014

Tippi Hedren Suit - A Major Shortcut!

So.  Cutting out.  Never anyone's favorite step in creating your dream garment.  I gave this step a lot of thought for two reasons:  1) I'm working with wool, which from my experience with the Gertie coat, I learned is difficult to mark because chalk is useless; and 2) this wool/cashmere blend is so soft it could slip through the proverbial ring.  The obvious solution was unpalatable: underline the jacket.  Underlining would provide body and structure to the wool, along with a great surface to make all my markings for darts, collar match points, etc.  BUT underlining traditionally involves hand sewing the underlining to your wool and then treating the two as one.  Ugh.

And then I got this idea.  This wonderful, awful idea.  Steam-A-Seam.  No, really.  I figured there would be three pieces that would need to be underlined:  the two fronts and the back.  (I won't underline the sleeves, and the facing/overcollar will be interfaced instead.)  I cut the fronts and back out of muslin and made all the markings I wanted.  Then I laid them down on the wrong side of my wool fabric:

 I pinned the muslin pieces to the wool about an inch and half from the muslin edges.  To apply the Steam-A-Seam, I lifted up the muslin cut edge and put a piece of Steam-A-Seam between the muslin and the wool, just at the edges of the muslin.  

The Steam-A-Seam, even unpressed, is slightly sticky and it kept the muslin and wool together sufficiently that I could go ahead and cut around the muslin pieces.  Then I picked up each piece (carefully), and place it on my ironing board, removed the pins, and pressed all the edges so the Steam-A-Seam adhered the muslin and wool together within the seam allowances.  

And voila!  My pattern pieces were underlined!  I realize that all over the world great past master tailors are rolling in their graves, but I don't care.  It was utterly awesome.  

I can't tell you how this simple idea has opened up my sewing possibilities - without having to handstitch underlining, I'll want to underline everything.  I already use Steam-A-Seam for putting in centered zippers (and I have secretly started using it for invisible zippers too, but I haven't perfected my technique yet), and now I'm wondering:  where else can I use this incredible stuff?

Once the garment pieces had cooled, I machine stitched down the center of my larger darts to keep the layers from shifting while sewing the darts.  Then I just proceeded to sew the jacket as usual.


 This wool is such a joy to work with.  It sews well, it presses beautifully.  I am getting spoiled by working with such a high quality fabric.  No wonder sewers become hooked on tailoring.  Here's a shot of the outside of the front of the jacket.  You can see the french dart:


I continued to look for a way to mark wool, though, and searched high and low for clay tailor's chalk, which will adhere better to wool than just regular chalk.  I finally found this from Wawak, 36 pieces for $ 8.45 in assorted colors.  


I knew I would need this for marking the sleeves, and for marking the dress pattern pieces which I will not be underlining. The pieces came packed in what looked like sawdust:


I used the yellow marker today on the sleeves which have a dart at the elbow, and it worked like a charm!  I can't recommend this product highly enough - I ordered it on Monday and it arrived on Tuesday!  So basically, I'm set for life on clay tailor's chalk.

Tomorrow I hope to finish getting those sleeves set in, cut out and sew the pockets, and figure out how to draft the front lining piece.  But it is coming along nicely.  : )

Sunday, January 5, 2014

Tippi Hedren Suit - Butterick 2178 & A Confession

I have to apologize; you know that deep freeze the eastern part of the US experienced this weekend?  The one that left everyone snowed in, stranded at the airport, and living in below zero temperatures? It's my fault.  Yep, I did it.  

I made a muslin this weekend.  Which caused the eastern US, and hell, to freeze over.  

I know, I should have seen it coming and warned all of humanity.  But I was too excited about proceeding with my Tippi Hedren suit based on her costume she wore in the film, "The Birds", which I got to see in person at the Hollywood Costume exhibit at the Virginia Museum of Fine Arts.

I've been obsessed with it for months.  Before I left on vacation, I bought Butterick 2178 on etsy.com because the jacket closely resembles Edith Head's creation:


 And then in Rome, I found this gorgeous wool/cashmere blend that I knew I would work beautifully:


 This shot shows the color more accurately:


It was 55 euros per meter and I bought three meters.  I goggled that and it works out to 3.28 yards of 60 inch fabric for $ 223.54.  By my calculations, the cost is $ 68.15 per yard.  That's actually not the most I've ever spent on fabric, but it is expensive enough to warrant a muslin.  

I wasn't so much concerned about the fit; the pattern is a 34 Bust which usually fits me fine, and this jacket isn't close fitting.  What I was more concerned about was understanding the instructions on how to put this thing together.  The collar is actually very similar to the Gertie coat, but the instructions are typical 1960s directions; that is, they are limited to one page for the jacket, the skirt, and the blouse:


That's it.  For the whole outfit.  (A far cry from Gertie's extensive sew-along!) Plus, the instructions called for sew-in interfacing which I have no intention of using and I want to make sure I understand the order of construction without it.

I made the muslin out of actual muslin fabric - I have a whole bolt of it.  No, I don't know why either, since I never make muslins.  I think I got it a Joann's and I must have suffered a seizure that day because  I have no other explanation as to why I have an entire bolt of white muslin fabric.

So here it is:


Not very exciting is it?  That's why I don't make muslins, because they aren't exciting.  But this one actually ended up being very valuable.  The instructions for this pattern are pretty blithe about the whole project; one section tells you how to pin the undercollar to the back of the jacket and then tells you to sew "in one operation" the front jacket darts and the undercollar to the back of the jacket.  I did not perform this step in "one operation", but in about six, carefully pinning and matching and sewing repeatedly.  The collar, like the Gertie coat, has a lot of "Y" seams, as quilters would call them.  They are tricky.

I ended up making one sleeve to check the length because the illustration on the envelope depicts the jacket sleeves ending just below the model's elbow.  Tippi's suit sleeves are longer than that, I want the longer length:


My muslin reveals that the sleeve length is actually longer than the pattern illustration shows and I am very happy with it.  Here's a photo which shows the suit in a little more detail, although I think the color is off; it is not this olive in real life:

 You can see that the collar isn't exactly like my pattern, but I like the pattern's collar better, so I'm going with it.  Also, you can see the sleeves have small one inch or 1.5 inch cuffs.  I like them, and I'll add them to my suit jacket.  

And Tippi's suit has patch pockets that go all the way to the hem of the jacket, which I've never seen before.  The pattern only has pocket flaps (but no pockets).  I like the patch pockets, so I'll add them as well to my version.

Finally, the pattern has no pattern pieces for a lining.  Tippi's costume was lined - I saw a photo of her running during the film, and the jacket was definitely lined, although it is a bit hard to tell because the designer Edith Head managed to find lining the exact same color as the suit.

My fabric is so beautiful and soft, it can slip through the proverbial ring.  Any jacket made with it deserves a lining.  So I'll have to draft a lining pattern, which I have never done before.  Based on my experience with the Gertie coat, I know I need to not use the back collar facing pattern piece and use the back pattern piece for my back lining, but add a one inch pleat in the back for ease.  I'm not completely certain how to make the front lining piece, but I'll review the pattern pieces of the Gertie coat to see how she did it.  I think I can figure it out.  

A couple of more facts about this costume; Edith Head is said to have designed it, but Edith Head's name was attached to a lot of films (especially Hitchcock's films), and there is no guarantee that she actually designed it.  It is possible that someone working on the costumes for the film did it.  Six of these suits were made for the film; necessary since there is the whole scene where Tippi Hedren is attacked by the birds and her suit is torn and bloodied.

I believe I will have enough fabric for a dress to go with the jacket.  The original costume has a sleeveless, high-necked dress with small gathers at the waist.  The skirt has a kick-pleat.  The photo above doesn't show it, but it was worn with a large belt with a square belt buckle.  My plan is make McCall's 5972 dress, a Laura Ashley pattern I've made before:


I'll make the blue version - the one without the collar.  I love the collar, but it shows under sweaters and jackets.  At this point, I'm going with this pattern because it only takes 1.25 yards of 60 inch fabric to make it, and my fabric has a twill weave which doesn't lend itself to gathering; I think a smooth waist is the way to go.

So that is it for now.  I started cutting out today, and I need to start drafting those pattern details I'm adding:  pockets, cuffs, and a lining!

Thursday, January 2, 2014

The Tale of the Yellow Skirt - McCalls 3341

Last winter Boden had a yellow wool skirt for sale; I really liked it, but the price, and the fact that I don't look good in yellow, kept me from buying it.  And then I started seeing yellow skirts all over the interwebs.  I mean everywhere. There is even a Yellow Skirt Gang which I didn't even know about until recently.  I decided my yellow skirt should be wool since winter is upon us.  My search for a suitable yellow wool in Richmond turned up nothing, and my relentless internet search was fruitless; yellow simply doesn't translate well on computer monitors - it always looks beige so you are unable to figure out how bright, how green, or how mustardy the yellow is that you are looking at.

So in December I had a business conference in NYC and I was determined to go to Mood Fabrics.  I tried to go last year when I attended the same conference, but I wasn't able to find the store and went to B&J Fabrics instead (where I ended up buying nothing because I was too overwhelmed by choice). This year I was prepared, and based on my Rome fabric shopping experience, I realized that having an action plan was key. During my interminable conference, I wrote up my shopping list:

1.  Yellow wool;
2.  A chambray-looking linen;
3.  Black eyelet.

Armed with my smart phone, I discovered Mood was opened until 7:00 pm, and I found it at the end of the day, skipping the elevator and walking up three flights of stairs, wearing my Gertie coat.  I was half-hoping Gertie would be there (how cool would it be to meet Gertie wearing the Gertie coat???), but alas, I saw no pink hair.

Yellow wool is easy to spot and I found the perfect mustardy yellow wool and bought 3 yards - all they had - even though I really only needed a yard for the pattern I had in mind.  I also found a good chambray-looking linen, but I struck out on the black eyelet.  Here's my haul:


My Shopping With A Plan worked; I was able to get what I wanted in the limited amount of time I had and the wool is an excellent weight.  Here's a close up so you can see the subtle weave:


So after about a year and half I had scored the exact yellow wool I had in mind . . . and then I went home to Cotton Creek, Alabama, and wasn't able to sew with it.  It was on my mind constantly, though, and the very night I flew back to Richmond, VA, I put down my suitcases and went straight to my sewing room and pulled out my TNT skirt pattern, McCalls 3341:


I have been using it for years - my pattern envelope has a copyright of 2001 - and it is still in print.  I would recommend that anyone looking for an easy skirt pattern consider this one, especially if you a beginner sewer.  It's a simple A-line skirt with only two darts in front and two in back.  No waistband, just a facing instead.  Right now, I have nine of these skirts hanging in my closet made in wool, cotton, and rayon.  I like view D, which is the red above-the-knee version on the envelope.

So here it is, an unexciting photo:


I wore it to work today with a black turtleneck sweater my mother gave me for Christmas, black tights, and black boots.  I figured as long as the yellow wasn't near my face, I'd be OK, coloring-wise:


You can see the wrinkling from sitting, but fortunately, the wrinkles don't last - this wool is very fluid and forgiving.


I really loved wearing this skirt today - it was my first work day of 2014, and going to work is always a little more fun when I have something new to wear!  The yellow is exactly as I envisioned it, and having such a bright fun skirt is wonderful for winter. 


I ended up lining it with the lining fabric I used in my Gertie coat since I had quite of bit of it.


I decided against using the yellow wool for the facings since wool can be itchy.  Instead, I used some of the leftover tablecloth fabric I used to make my 1970's skirt last summer.  All these different fabrics make the inside look pretty groovy, but I like the effect and no one can see them but me:


 The result is a comfortable waistband that isn't scratchy.  I think this skirt will get lots of wear this winter - the yellow goes well with navy blue, bright royal blue, and purple.  And I have a beautiful brown cashmere turtleneck (another Christmas present from Mother from a prior year) that will look great with it, along with some brown pumps when the weather isn't quite boot weather.

All in all, this came out as I envisioned, and I couldn't be more pleased.  And the best part:  I get to start working on my Tippi Hedren suit!

Saturday, December 28, 2013

Yearly Round-Up!

I don't normally do a year-end blog post due to Christmas busyness, but I'm in Cotton Creek, AL for the holidays, not sewing (how unfortunate), so why not?  Here goes:

By my math skills, which are admittedly poor, I made 17 garments this year.  That is extraordinarily productive for me, especially since one of the projects was the slow-sewing Butterick coat.  2013 was definitely the year of the shirtdress, and by my count I made eight (one of which I have not blogged about yet).  

So rather than a whole year-in-review, let's go with some highlights and lowlights, the disasters first so we can get them out the way.

My top two, didn't-work-for-me projects were:

1.  The "My Favorite Things" wrap dress I blogged about here.


I don't see any reason to enumerate all the pattern's deficiencies, as I covered it pretty thoroughly in my original post.  So, moving on:

2.  Vogue's 8648, the Couture Dress that I attempted to make without the Couture Craftsy Class:


It looks fine, but the bodice neckline and armholes are too low.  I've worn it exactly once, which is the day these photos were taken.  It is a shame too, because not only was the dress a joy to sew, there was endless matching and lining and the fabric is a wonderful silk/wool blend.  Except for the fit, I love it. This, dear readers, is the shining example of why a muslin is important.  Although I haven't quite figured out how to fix the fitting issues, so I'm not certain a muslin would have helped, other than it would have discouraged me from making the dress in the first place.  I want to make it clear, however, that the pattern drafting was not the problem with this project; it was my execution.  

Let's move on to the winners in an effort to throw off the "why didn't I muslin" blues.  Here's my top three highlights of 2013.

1.  My coat, of course:


 You've certainly seen plenty of Butterick 5824 from my endless blogging about it here and no more needs to be said except that I haven't stopped thinking of this coat as a miracle, that it actually turned out and functions as, well, as as coat.  I wore it NYC earlier in the month and I was toasty warm.  

2.  My Lock-And-Key shirtdress, vintage Simplicity 6584.  I ended up wearing this constantly throughout the summer and receive compliments on it where ever I went.  I'm going to have to make more of these:


3.  And finally, one dress that I will definitely be making more of is the Hawthorn.  I made two:


Probably in more linen fabrics.  My white Hawthorn was the first linen I had ever worked with and I am now hooked.  In a big, big way.  My only change to the Hawthorn will probably be that I will make the collar a little wider.  I was reading some blog posts on the Hawthorn and someone pointed out that the collar was a little narrow, which I never noticed, but once someone mentioned it, I thought, well, yeah, it kinda is.  I think I will widen it by a half inch and see how I like it.

So that is 2013.  I have big plans for 2014 - more to come when I return to Richmond, VA to sort through fabrics and match up with a seemingly endless supply of patterns.  First up - a yellow wool skirt.  Hopefully next weekend.

Today is the fourth day of Christmas, so Merry Christmas, y'all!

Sunday, December 15, 2013

Christmas Dress Complete - Butterick 4919

All I have is cell phone photos but here it is:


(Above with Tammy.)

Here's a full length:


And here's a photo that shows the silk's beautiful sheen:


My prior post on this dress is here.  Some final notes on this dress:

1)  As previously noted in my prior post, I did not enjoy making this dress.  I do not know why.  It was one of those dresses that was a real pain to sew, but I loved wearing, unlike Vogue 8648 which I loved making, but wore only once.  The last step for this party dress was sewing the hooks and eyes on the back bodice, and I delayed until 4:00 pm on the day of the party.  Definite procrastination.  

2)  The color ended up being wonderful.  I really loved it when all was said and done.  The color changed with the light and ranged from blue/turquoise to green depending on where I was standing.  

3)  The money I spent on the 6 yards of silk for this dress was totally worth it.  The fabric made the dress; I had perused the "fancy fabrics" aisle of my local Hancock's while I was in the planning stages, wondering if I could get away with a cheaper synthetic material given the cost involved with silk, but decided no.  Real silk was necessary.  There is nothing like the rustle of a full length silk skirt for a party.  

4)  The neckline was low.  Real low.  But there was still sufficient coverage in the bodice that I didn't feel exposed or inappropriate.  But I mention it in case you would want the neckline raised an inch (or two!).

5) I ended up hemming the dress according to the instructions, and the length of the skirt was perfect.  (Hem was 5/8 inch.)  But I am 5'5", and most patterns are drafted for women who are 5'6".  If you are shorter or taller you made need to adjust your skirt length accordingly.

6)  I thought about wearing the crinoline under this dress that I wore with my wedding dress, but in the end I decided the crinoline would make it a little too costumey.  The lack of crinoline made the circle skirt less full looking, but it resulted in a more modern silhouette.

I went to my hairdresser for an "up-do" for the party and I really loved the result:


I've decided if I ever get rich, I'll get my hair done more often!  What fun!

Next:  I was in NYC this week and went to Mood Fabrics.  Next blog post will be all about my haul!

Saturday, November 30, 2013

Christmas Dress - Butterick 4919

My employer has a large Christmas party every year at The Jefferson Hotel and it is a stunning venue.  Very festive.  I usually make my dress each year, but have very little time to make it, much less blog about it.  This year is no exception, but I knew early on that I wanted to make Butterick's re-issue of 4919.  (For the life of me, I can't find my pattern envelope, so you'll have click on the link to see the pattern.)

The pattern appeared to fit my requirements of a Christmas dress:  simple lines but a full circle skirt for maximum impact.  My go-to choice of fabric for a party dress is shantung silk.  It is the easiest of the silk weaves to work with.  Shantung is a lot like dupioni silk, but it has a smoother, more refine weave; that is, the slubs aren't as noticeable. And it has a lovely sheen.  

Here's the weird thing about shantung silk:  unwashed it is lightweight but it has a nice crisp body and keeps a crease incredibly well.  But if you wash it, all the body goes with it, becoming a mere wisp of its former self.  It reminds me of cotton candy - it looks substantial, but once you apply moisture, it is reduced to nothing.  

I sew my shantungs unwashed, and dry clean them as the garment warrants later.  I had some dark red, nearly burgundy, colored shantung in my stash, but it was only 45 inches wide, and I really wanted to make the long skirted version of this dress, which requires the wider 60 inch fabric.  I thought about black as this dress would have really been dramatic in black, but I get tired of seeing everyone in black, especially at a party.

I decided on a color at NY Fashion Center Fabrics website (where I also bought my wedding dress silk shantung fabric) that was described as "turquoise".  In incandescent yellow light it looks more teal, and I don't like teal, and I should have gotten a swatch first, but I didn't have time.  So I'm stuck with it and here is the color outdoors: 


See that great sheen?  I'm counting on that sheen for dramatic effect!)  

As with past Christmas dresses, I give myself permission to do a half-assed job.  That means no finishing of seam allowances or too much fiddling with zippers, or re-doing, etc.  My reasoning is that this dress will be worn once, maybe twice, so there's no point in spending the time on quality construction on a dress that doesn't have to survive the washing machine or repeated wearings.  Also, the party is dark, filled with people full of holiday cheer (i.e. alcohol), and no one is going to notice the details.  And after I'm done wearing it, I'll cannibalize it for other projects.

What they will notice is the color and the sheen and the big skirt - my sewing approach is like costuming, which I learned about at the Hollywood Costume exhibit at the VMFA.  I'm going for an illusion here, folks, not an award for Best Dress Construction.  A case in point, the front v-neck:
 As you can see, it's my usual, not-so-great job in precision sewing.  But its fine, because it is going to be covered by a beautiful gold and diamond brooch my father gave me many Christmases ago.

The hand and smell of this fabric brought back memories of making my wedding dress, and I was reminded of something else from making my wedding dress experience too:  I ended up not having enough fabric to cut out my dress.  When I was making my wedding dress, I just figured my layout wasn't in accordance with to the pattern instructions and I just ordered more.  But this time, I laid out the pattern pieces exactly as illustrated, and I ended up short.  I think the reason is that this silk is 54 inches wide (or maybe shorter) than the 60 inch layout.

I didn't have the time or the money or the motivation to order more "turquoise" fabric.  I just cut out the front bodice lining piece from some hot pink shantung I had in the stash, which I think is a complementary color to the turquoise:
 (If it ends up showing a little bit while wearing the dress, I hope people believe it was a deliberate design feature rather than having insufficient fabric!)

A few words about this pattern.  It is weird.  The wrap bodice has a new-to-me construction that was difficult to picture in my mind, and I just had to take one step at a time and see how it went.  Also, this dress can't really be tried on as you sew, making alterations-as-you-go damn near impossible.  And there are no shortening or lengthening lines on the bodice, so if you don't have a fairly standard figure, I haven't got the slightest clue how you would fit this thing to your body.

And for whatever reason, I haven't enjoyed making this dress.  I cut it out before I went to Italy, I constructed the bodice the weekend I got back, and this weekend I constructed the skirt, attached it to the bodice, and put in an invisible zipper.  It's coming along but I'm not enjoying it.  Here's my zipper with no finishing of the bodice edges:


 I thought such quick sewing would be fun and freeing after the slow-sewing Butterick Gertie coat, but no dice.  I think, deep down, I want to be working with wool/cashmere tweed I got in Italy, but I have to finish this dress first.  

Here's a photo of the gathered shoulders which I'm not entirely happy with - this silk is thick and didn't gather very well, unlike the pink lining which was thinner and gathered beautifully:


I tried it on this morning and the good news is that the dramatic effect I was going for was all there.  Also, the length is good - all I'll have to do it turn the skirt up 5/8 inch and topstitch it down and call it a day.  I do need to sew on some hooks and eyes, and handstitch the bodice lining, so I'm in the home stretch.

More photos to come when I'm done, and hopefully made up for the party!