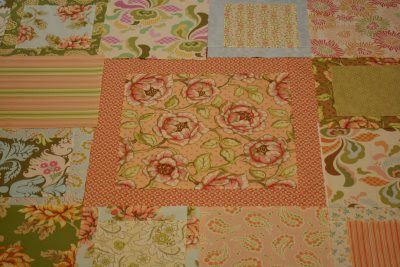
As usual, Susan Caldwell at Quilting Around the Block did an awesome job with the pantograph. I can't remember what it is called, but here is a shot of the muslim backing show the pantograph: I love it! Here is a shot of the front:
 I love it! Here is a shot of the front:
 This quilt ended up finishing at 88 inches x 88 inches and I thought this was a perfect time to try Judy's binding video tutorial and sew the binding on completely by machine. The whole purpose of this quilt was to make it simply and get it on the bed because I loved the fabrics so much and they matched perfectly with my bedroom decor (which I can't take credit for - the woman who owned the house before me picked the wall paper, the drapes, and the carpeting and she did a masterful job!).
 Judy's tutorial is great, and she makes it look easy. She does stress that the success of this method lies in using really sharp pins. I used the sharpest I had which were silk pins. They were key to making sure the binding did not move while sewing it down from the front. I didn't quite get the nice corners Judy did:
 Although my corners look fine from the front:
 I sewed one side and one corner at a time, so I had four chances to improve. At first, I folded the binding over a little too much and this resulted in a little "lip" on the back:
 But then I improved:
 And I admit that her method looks awesome from the front! In most places you would never know from the front that the binding was sewn by machine and not by hand:
 Now my stitching isn't perfect, but this is my quilt to go on my bed, so there will be no quilt police entering my house to inspect the quality of my work. I'm so pleased with this because doing it this way probably only took me one-third of the time if I had done it by hand. I'm not a big fan of handwork, and sewing bindings down by hand was really the only handwork I ever did - but all that has changed now. I will probably use this method from now on, unless the quilt is an extra-special one.
 Although my corners look fine from the front:
 I sewed one side and one corner at a time, so I had four chances to improve. At first, I folded the binding over a little too much and this resulted in a little "lip" on the back:
 But then I improved:
 And I admit that her method looks awesome from the front! In most places you would never know from the front that the binding was sewn by machine and not by hand:
 Now my stitching isn't perfect, but this is my quilt to go on my bed, so there will be no quilt police entering my house to inspect the quality of my work. I'm so pleased with this because doing it this way probably only took me one-third of the time if I had done it by hand. I'm not a big fan of handwork, and sewing bindings down by hand was really the only handwork I ever did - but all that has changed now. I will probably use this method from now on, unless the quilt is an extra-special one.
Then I did something I have never done to a quilt that I have made (except for my first one) - I washed it. I decided that it would have to be washed at some time in the future, and there was no time like the present. VickiW assured me that she simply puts it in the washer and then in the dryer, no problem. And she was right; it came out soft and crinkly. I immediately put it on the bed and I'm laying under it now as I type!
One thing I did want to mention: when I was initially sewing the binding onto the front of the quilt, I tried Judy's method of moving the needle all the way to the right needle position and using the edge of the walking foot as my guide. The advantage to this was that way more of the quilt was under the walking foot and thus, the quilt was pulled along under the foot with a lot more force, making the whole process much easier. Wish I had been doing this all along.
Parting Shot: Two more blocks of the Double Wedding Ring Quilt got done this weekend. Fourteen done, six more to go!
Parting Shot: Two more blocks of the Double Wedding Ring Quilt got done this weekend. Fourteen done, six more to go!