Sunday, October 25, 2009

A Finish!

I finished piecing the Heartstrings quilt this weekend and I couldn't be more thrilled. Here is the whole thing: I've had this quilt knocking around in my head since the beginning of this year, and it was like I was on a mission to bring it into reality. I envisioned it as a man's quilt, so I used the brown strips, set off by the red half inch strips on either side. I also used fabrics I thought as "manly", like those depicting nature (leaves, trees, animals), along with fabrics from shirts, or those that look like they were from old shirts. Some of the fabrics I had left over from making shirts for friends, like Glen. Some of the fabrics were from four or five old shirts destined for Goodwill or the garbage. Here is one of the shirts I used after I cut the back out of it for strips:
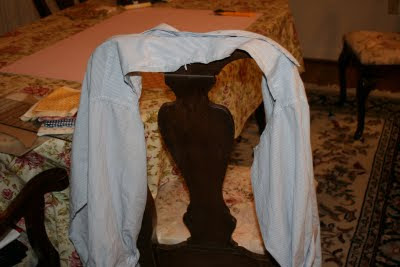
Looks pretty funny with no back! But I found the back of a size large man's shirt provided a good size piece of fabric perfect for cutting strips with the rotary cutter. After making this quilt top, I have discovered that I am looking at men's shirts in a whole new way: Friday at work I was eyeing a co-worker's shirt he had on, thinking, "that shirt would look good in a quilt"! You can't just ask a man for his shirt, especially if you tell him you want to cut it up. I'll have to keep my eye open for shirts at Goodwill in the future.
I originally envisioned putting brown borders on this quilt, but having sewn the blocks together, I like it just the way it is above, with no borders. I'll use the same red fabric to bind it, and I think it will be perfect. (One thing I did notice about this quilt is that I seemed to end up with MORE fabric strips in my stash after I finished the quilt than when I started. Anyone else have this problem?!!!!)
The quilt will finish 54 inches x 72 inches, and it is a small enough size that I actually considered quilting it myself on my Bernina. But then I remembered I wasn't crazy. Susan Caldwell is currently quilting two customized lap quilts for me, so when I pick them up, I'll drop this one off. I also originally planned to give this quilt away, but I like it so much, I might just have to keep it. I think I'll call it "A Man's Heartstrings".
Parting Shots: I went to the Celtic Festival today and I got what I usually get: muddy boots.
I don't know why, but every year I go, we seem to have Scottish weather, cool and windy, with rain the day before. The bluster makes the festival feel authentic. I also got what you always get at fairs: junk food. It's not a festival without Kettle Corn!

Tuesday, October 20, 2009

I Got A Present!

My friend Loy made me this necklace and sent it to me week before last. I found the rock at St. Bee's Beach in northwest England, where we visited in May of 2007. The photo doesn't do the necklace or the rock justice - the smooth rock, right from the Irish Sea, is a deep, smooth green color, and Loy drilled a hole in it and suspended it from the copper thingy. She did a fabulous job, and you can read about her work here. (Note: Loy's real name is Laura, but Miss Eileen named her Loy when they were roommates in college, so there's nothing she can do about that.) Currently, Loy is teaching a beading workshop, and is having a big sale in November. (If you are interested in her incredible stuff, I can hook you up - drop me an email or leave a comment.)
Photos I took while at St. Bee's Beach. First the young lovers: Doggies are everywhere!

Really beautiful scenery, and the approximate area where my stone was lying when I found it:

There were people actually swimming in the incredibly cold ocean when we were there. It was sunny, but NOT warm:

The Double Wedding Ring Update: I have all the blocks sewed together in rows. Now I need to join the rows. This isn't as simple as it looks. Apparently in order to always sew with the white part of the block on top, one has to sew on the seam for a while, and then flip the whole business over and sew on the other side for a while. At least this is what is explained in the directions. I need some uninterrupted sewing time to figure it out.
To take a break from all that, I am making a Heartstrings quilt, as mentioned in a previous post. I have half of the blocks DONE. It is such an easy block to make, particularly in comparison to the DWRQ. One thing that has come in handy is the rotating cutting mat I got to make the DWRQ. It makes life so much easier and I am using it on the Heartstrings quilt as well.
You start off with a block that looks like this:
You trim a side and then rotate the mat for each side like so:

And your finished block looks like this:

Why didn't I get one of these years ago???
Parting Shot: Half of the Heartstrings are blocks done. I'm loving this!

Tuesday, September 29, 2009

Sewing ADD

My 30 minutes a day is paying off! For the past week, sewing 30 minutes a day on the DWRQ has allowed me to finish the nine remaining "footballs" and get one row sewed together! Wooo-hoo! Obviously, such industry must be rewarded, and what better reward than to irrationally begin a new quilt???? My motivation for getting the DWRQ pieced is so I can start one of Mary's Heartstrings quilt. So against better judgment, I did. These are the first 8 blocks I made this past weekend. They aren't sewn together, but I laid them out so I could see how they will look. My intent is to make a man's quilt, so I made the center strips all brown. In order to set the brown strips off, however, I added the red strips down each side of the brown. You can see a close up here:
I cut the brown strip 2 inches wide and the red strips 1 inch wide. So the red strips finish at 1/2 inch wide. (I saw this variation on Mary's blog by one of her readers, but now I can't locate the post where Mary showed it off.) The rest of the fabrics are what I would consider "manly" fabrics. I am using outdoorsy prints, civil war reproductions, and at least five castoff shirts given to me by my (boy)friend who was getting rid of them anyway. One of the fabrics comes from his old welding coveralls. He had used duct tape to cover the rips in the knees, and the only usable part of the coveralls was the back, but I got a few good strips out of them! I'm having a lot of fun with this quilt and the easy block is fun and quick compared to the DWRQ.
In other fun news, I found my mother's wedding dress! Well, not really. My grandmother made my mother's wedding dress when my parents got married in 1962. I remember the dress when I was child; my mother kept it in a gray box wrapped with a couple of pastel ribbons. I used to open it as a girl and look at it. I thought it was the most beautiful dress ever. It was in two pieces: a satin underdress that was strapless, and a lace overdress, with a bateau neckline, long sleeves, and basque waist. Unfortunately, in our last move before my father retired from the Army, the dress was lost. I was so disappointed. I loved that dress. About a dozen years later, my grandmother died, and all of her sewing supplies, including her patterns were sold or given away.
I didn't start sewing until 2003, and since that time I have been on the lookout for the pattern that was used to make Mother's wedding dress. I had always hoped that if I got married, I could be married in the same dress. With the internet and the explosion of interest in vintage patterns, this search has allowed me to waste, I mean, enjoy, hours of my time looking at vintage wedding dress patterns.
So a couple of weeks ago, I was on Erin's Dress-A-Day blog where she linked to a Wiki site of bridal patterns. (It's her September 8th post.) Something told me that my grandmother would have likely used a Simplicity pattern. I don't know why I felt that, but I did, so I started with the Simplicity patterns, and after about a half dozen clicks, there it was:
Here's a better photo that I shamelessly stole:

I knew this was it; right down to the basque waist. I was further convinced when I found out that the pattern was published in 1962. Here's a close up of version 1 which was used to make my mother's dress:

My grandmother also used the pattern to make all three bridesmaids dresses, in yellow, as I remember. I emailed the photo to my mother, who said, "Yep, that's it." Here's a photo of the dress worn by my mother on her wedding day:

Unfortunately, you can't see the waist very well in the photo. But dig the pointy sleeves at the wrists! I love it. This photo is of my parents at the Baha'i wedding at my grandparent's house, so Daddy is wearing a suit and Mother isn't wearing her veil. Later that day, they had the Christian church wedding, where Daddy wore his dress blues, while Mother did wear her veil. (Also made by her mother.)
Now armed with the pattern number, I just googled it, found two of the patterns for sale, one of which was in my size. I ordered it pronto and I am now the proud owner of the pattern for this great dress. Rest assured, I'm in no danger of getting married, but if I do, I have the pattern for it!!!!
I'm thinking that my grandmother would be vastly amused that the pattern she paid 65 cents for in 1962 is worth $ 40.00 in 2009.

Wednesday, September 23, 2009

Where I Have Been

I took last Friday off and headed north to the Philadelphia Quilt Show with my friends, Eileen and Loy. Unfortunately, the Crab Dress did not go due to weather/time/ironing concerns. It's complicated.

The three of us really enjoyed the Show. There was an international component this year, and it was fascinating to see quilts from Japan, Australia, and Ireland. The Japanese quilts were of such exquisite workmanship, it was hard to really comprehend. And there was collection of quilts made in the US specially during WWI and WWII which was wonderful. It became clear to me as I walked amongst the hundreds of quilts that I am simply drawn to the more traditional quilt patterns, rather than the contemporary styles these days.

Of course, there were plenty of vendors as well. I wish I could say I showed restraint, but I can only say that in quantity of yards purchased. There was no restraint in the amount of dollars spent. Because I found THE most gorgeous piece of fabric ever. It is a cashmere/mink blend in black: Of course, the photo doesn't do it justice, especially since it is so difficult to photograph black. But it is so soft and supple, it can slip through the proverbial ring. It came from one vendor booth selling luxury fabrics from Italy and I fondled every bit of it. This cashmere/mink is the most expensive fabric I have ever bought and will become a skirt for me this winter, lined in silk. The fact that I only bought a scant yard, and nothing else took a supreme act of self control. Of course, the bank account balance helped me in that regard.
As for quilt fabric, I bought this: Some was bought at the quilt show, some was at a LQS near Loy's home during the weekend. I especially love the bottom-most fabric which is called "Scarsbough Fair" by Windham Fabrics. I am planning one of Mary's Heartstrings quilts in my head with all this yummy stuff, so I am motivated to get the DWRQ done.
Speaking of which, I have all 20 quilt blocks of the DWRQ done!

Of course, that isn't all. I still need to make 9 "footballs" to complete the blocks that will go around the outer-most edges. I wanted to join the 20 blocks first, and then sew in the extra "footballs", but my rational mind said that trying to sew those footballs on when all the rows were sewn and joined was just an opportunity to stretch those biased edges. And we don't want that.
So I am dutifully making those footballs. Here is my progress:

I so want to get going on the Heartstrings quilt that I have adopted Summerset's idea of "30 minutes a day" to get this DWRQ done. I work on it 30 minutes a day, and then I stop. I am amazed to find out how much I can get done in just 30 minutes on a quilt. Last night I had a date, so I came home from work at lunch and did my 30 minutes. I am committed. Or should be committed. Whatever. It's working for me.
Parting Shot: When I flew home from Philadelphia on Sunday, I found that someone had spruced up my flower garden bed by putting in new scalloped border blocks. Which replaced the old icky two-by-four which had been there for at least a dozen years. I owe him a homecooked meal!

Wednesday, September 9, 2009

Time to Make A Jeans Skirt for Fall!

Saturday I made a pair of jeans into a skirt. The jeans weren't old or worn or even too short: I made them into a skirt because these pair of Levis I bought last fall had a goodly amount of spandex in them. And while the spandex made them very comfortable, I was NOT comfortable leaving the house wearing them. The spandex molded the jeans to my body in a way that left little to the imagination and that wasn't cool. My choices were to donate them to Goodwill (but then I'd be inflicting them on some other unsuspecting soul), or make them into a jeans skirt.

This is the third jeans skirt I've made since I started sewing and I have used the same instructions each time, which are the BEST and easiest instructions I have found on the internet. The instructions are from savyseams.com and they are found here. Go ahead a look at them. Go on - I'll wait for you to get back.

I guarantee you that if you can operate a sewing machine, you can do this. I'm posting how I did it using savyseam.com's instructions because I have a few tips to add. First, I used the two panel method, rather than the four panel. That is, I added fabric at the front and the back, but not on the sides. This mades the skirt a little more straight, and less flare-y.

OK, start with a pair of jeans and cut the legs off. I cut my legs off 19 inches from the bottom. The way to get the most accurate cut is to measure from the hem up: Next, cut off the inseam in accordance with the instructions. This is one of the reasons I really like the method from savyseams.com. You aren't fiddling with a seam ripper to undo the seam, you just cut it off: Next, draw a line from about 2 inches below the back yoke to the bottom of the leg, like so:
And cut like so:

Do this on the front as well, about 2 inches from the end of the zipper. See the instructions at savyseams.com:


Refer to the instructions to release the front and back center seams, and then iron the raw edges of the former inseam under about a half an inch:


Use the fabric from the legs you cut off to fill in the triangle areas in the front and back of the skirt, and then pin. I do one side at a time. This is the back:

First, edgestitch along your folded edge, then stitch again about a quarter of an inch from the edgestitching. It will look like this:

One thing I have discovered is that thread made specifically for jeans doesn't work so well. I just use regular thread in a color that matches close enough. Works well.
This is what the inside will look like. After you do your stitching, cut away the excess on the inside of the skirt:

Do this, of course, for the front and the back. Now you just have to hem it. The way I hem it is to lay the jeans skirt flat and measure down from the waist. I marked my hem 21 inches from the top:

When you lay your skirt flat, make sure the front waist naturally falls lower than the back waist. This will make you hem a lot more even:

After marking, cut the front and the back to length at the same time:

All trimmed up:

Next, I like to run a machine stitch around the bottom about 1/2 inch from the edge of the skirt:

Then I like to throw the skirt in the washer and dryer and let the bottom hem just naturally fray. Unfortunately, that didn't work on this skirt. I think it is because of the spandex in the fabric. After washing and drying it, my hem just looked like this on the right in this photo:

On the left you can see a previous skirt I made where it frayed quite nicely. Not so the evil spandex jeans - I just got strings hanging down where the fraying should be. So I used my newly-trusted serger and finished the bottom edge. I guess I could have just left it like that if I was going for the deconstructed look. But for me, "deconstructed" is the same as "too lazy to construct", so I turned up the hem just past the line of 1/2 inch stitching, pressed it, and then top stitched the hem. It ended up looking like this which is much neater:

Here is my finished skirt:

Still a bit snug, but much better! I can see wearing this with a sweater and some boots come fall.
I would say that this skirt took me about an hour and ten minutes to make, not counting the extra hemming I had to do. If you just did your hem like I intended and let it fray, the whole thing shouldn't take you very long at all. Anyway, I love those instructions - check it out!
Parting Shots: I got an apron! My LQS was having a sale on shop samples, and I spied this and grabbed it. I love it for two reasons: the adorable rick rack, and the fact that VickiW made it! It had to come home with me so as to not risk it going home with someone who wouldn't value it:
So to celebrate, I had to cook! I made my first red velvet cake in the new cake pans my mother gave me. It was yummy, and I even let other people have some!

Saturday, September 5, 2009

Quilt Binding Further Explained

I got a beautiful email from Laurie asking for further clarification on my quilt binding tutorial, which I am only happy to attempt to answer. Specifically, she wants to know how to fold your binding parallelogram before you begin your rotary cutting of the binding strips. Frankly, this step always requires me to sort of stand back and think about it myself each time. But here is the answer:

Let's pretend this is your binding parallelogram:

This is just a strip I had lying around, and we will use it for demonstration purposes. See how the sides are cut on the bias? Now turn your parallelogram like this, so that your bias edge is on the vertical lines of your cutting mat like this: Then fold your binding parallelogram like this:

And then cut your strips on the vertical lines of your cutting mat. That's it. I know the folding seems unnecessary, but that is because this strip used for demonstration is a lot smaller than your binding parallelogram if you are making a lot of bindng. Your binding parallelogram will be big, and folding it will allow you to cut your strips easily using your acrylic ruler, which is probably no more than 24 inches long.
I hope this helps - please email me or leave a comment if you have any other questions. Thanks so much for the feedback, Laurie!

Saturday, August 29, 2009

I Actually Sew Something


I haven't been sewing a lot lately because, frankly, I've been dating. I had forgotten how much time that takes out of your life! But I finally had a whole Saturday just to sew, and I got inspired to make a wool circle skirt. Yesterday, I wore the yellow dress to work:I realized I hadn't worn it all summer, and summer is waning fast. This is my tried and true bodice with a circle skirt from this dress pattern:

I got compliments on it all day long from both friends and strangers (thanks to the woman in Panera who told me how much she liked it!), so you'll have to believe me when I say it looks better on me than on the hanger. I had forgotten how much fun it is to wear a circle skirt, so I decided I needed to make just the skirt with a waistband from a beautiful piece of wool I have had aging in my stash from 2003. I got it at The Fabric Place outside of Boston which has now gone out of business. I still had the write up the saleslady gave me: 3 yards of 60 inch wide wool at $9.99 a yard. It is a dark, dark blue, with a very subtle plaid to it and has such a wonderful hand, it could slip through the proverbial ring.
I spent some time laying out the fabric so the sides would match up horizontally. I laid the excess fabric over my ironing board so the fabric wouldn't stretch as I cut it out.

The width of this fabric was just barely enough to eek out this skirt. As soon as I cut it out, I put painters tape on the wrong side of the garment pieces because it is a great way to keep the right side and the wrong side differentiated until you get it put together:

I ended up putting in a black zipper instead of a navy one because the fabric was just so dark. Here you can see the difference:

Circle skirts are generally easy because there are no darts, and very little fitting other than the waist. But for some reason this skirt took me nearly all day.

Blogger is aggravating me and won't let me move my photos around, but you can see from the photos up top that I used my serger to finish the seam allowances, even though the thread didn't remotely match, but I figured no one was going to be looking at my seam allowances. Also, you can see the horizontal plaid matching at the side seams. I used my walking foot to sew the side seams. I used a button as my closure rather than a snap, mostly because I can get my sewing machine to do the buttonhole AND sew on the button automatically, while the snap closure requires actually hand sewing. And we don't want that.
I used bias tape to hem a la Summerset, as I did for the silk dress and it worked well. I tried the walking foot to sew the machine hem, but that didn't work very well and went back to the regular foot. Circle skirts are a PITA to hem, though, just because the hem goes on forever and ever. I considered lining this skirt, but that was going to require me to hem the lining as well, I decided I would just wear a slip instead.
I was aiming for a 29 1/2 waist for this skirt, but it ended up being nearly 30 inches. Don't know how that happened since I clearly marked 29 1/2 inches on my waistband, but there you go. That extra 1/2 inch will probably come in handy this winter when I am tucking in sweaters. I have discovered that the trick to wearing circle skirts is to wear them with closely fitting tops. If you don't, you look shapeless.
One last note, I cut the waistband on the bias. I do this for all my wool skirts ever since a Korean lady in Massachusetts told me to do this because it would make my waistbands lay closer to the body. I don't know if it is true, but I like the bias effect on my plaid skirts and I don't have to worry about matching the plaid with the skirt.
Bring on Fall!